Utilities
Modifier Presets
Use this tool to store modifier presets. It saves values from the modifiers applied to a node. The tool has three dialogs: the main dialog displays a list of preset buttons, one dialog adds new presets, and the other manages saved presets.
- Start the tool, select the object(s) to apply modifiers to, and click the desired preset from the list.
- To add presets:
- Select an object with modifiers applied, then click “Add presets.” If nothing is selected, pick an object.
- Select a modifier from the list, edit the name, and add the preset.
- Use “Edit list” to reset, remove, or rearrange the preset list.
Paneling
Create a grid of panels (boxes or custom geometry) on a planar surface. Originally designed for quickly modeling furniture cabinets and adding handles, this tool is now multi-purpose.
- Set the operation surface by defining a rectangular area with two points: the lower-left and top-right corners.
- The rectangular area is delimited:
- Base point
- Third and last point set the width. Hold SHIFT to invert the up-direction.
- By default, the tool creates panels with standard box objects. Start the tool with an object selected to use it as the source for the panels.
- Set grid vertical subdivisions by moving the mouse toward or away from the first point (the lower-left corner), then confirm with a left-click. Repeat for horizontal divisions. Each grid cell corresponds to one panel.
- Use the UI to set the gap between panels and thickness. The checkbox next to the spinner disables custom thickness for reference object mode and uses the original height instead.
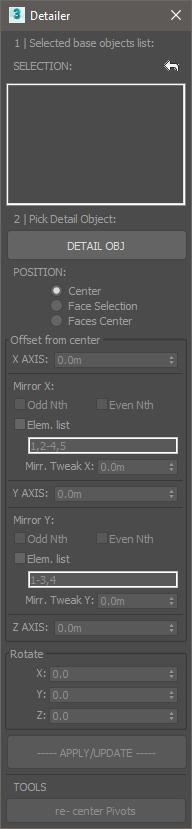
Detailer
Best used as a complement to the Paneling tool. This utility allows you to parametrically place an object over a selection.
- Select the Panels (or objects) you want to add the features. The list on top will change dynamically showing the selected objects. Use the ”<-” button to reset the selection.
- Pick a detail (feature) object.
- Offset options:
- XYZ displacement from the base object’s center.
- Mirror: Mirrors objects following the selected rule. Note that the indexes correspond to the object’s order in the selection list.
- ODD and EVEN: Mirror odd or even Nth in the list.
- List: type comma separated individual objects numbering or use score symbol to set a range of objects.
- Mirror: Mirrors objects following the selected rule. Note that the indexes correspond to the object’s order in the selection list.
- Rotate details.
Re-center pivots addresses situations where the detail object has a displaced pivot or to correct misplaced pivots in the result.
Map Tools
Texture coordinate-related tools
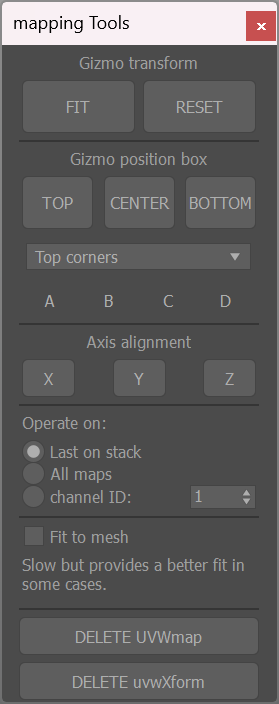
Map Tools
Fit, center, and reset UVW gizmos (these tools are only available by default through the UVWmap modifier in the command panel; they were written from scratch) and delete UVW or UVWxform modifiers in selected objects from a convenient dialog.
By default, Delete UVWmap removes only the last modifier on the object’s stack. Use LEFT CLICK to delete all modifiers in the stack. The same applies to Delete UVWXform.
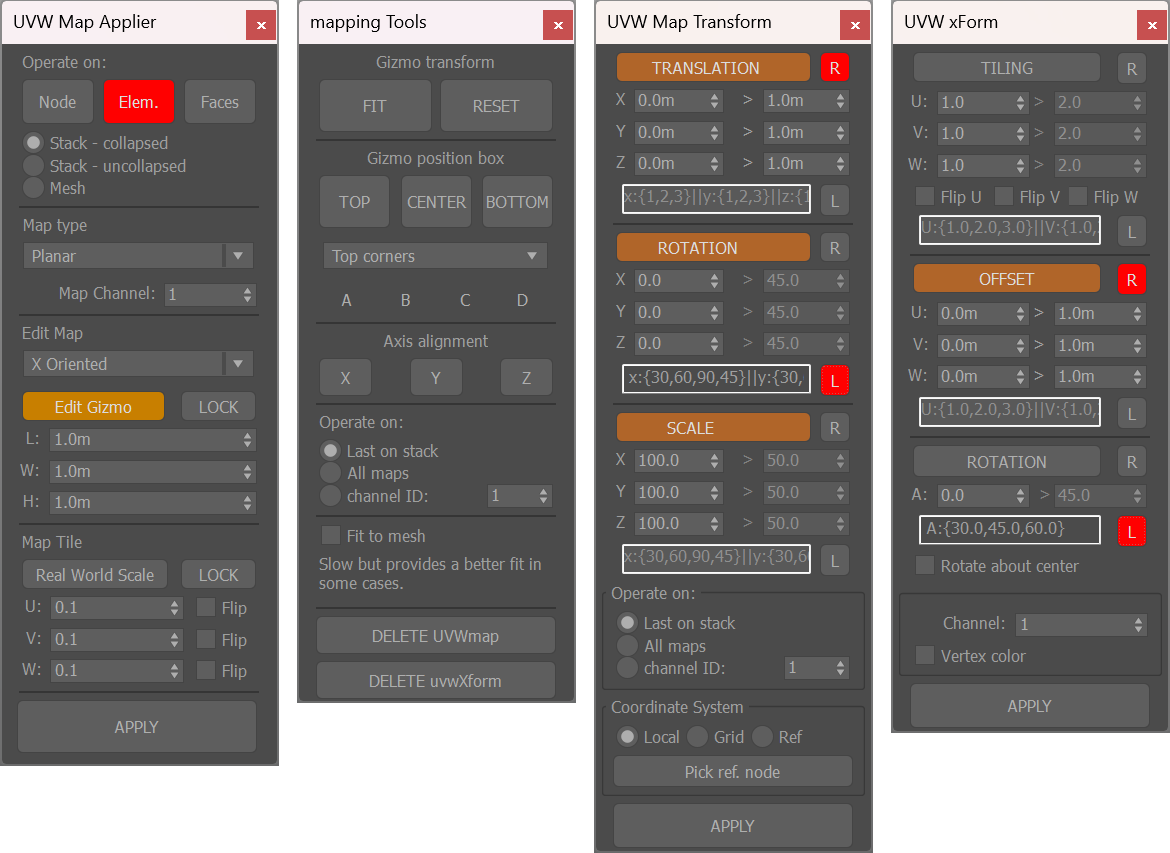
multiMap
Add individual UVW modifiers to a selection of objects, poly elements or faces. Randomize gizmos, transform direct mesh coordinates or add random UVWxform modifiers
Snaps states

Save current active snaps as a named set and reuse them from the floater dropdown list

Color Clipboard
A dockable color swatch bar.

- The ”+” button populates swatches with random colors.
- LEFT-CLICK to fill unused slots.
- RIGHT-CLICK to replace all samples.
- RIGHT-CLICK on a sample to copy or paste a color.
- Drag and drop colors to and from the material editor.
- Use the ”…” button to apply HSV adjustments to the colors.
Wireframe Colors Adjustment
Adjust HSV values of the selected object’s wireframe color.